Redis数据备份与恢复以及迁移解决方案
一、测试准备
文章推荐:Redis二进制编译安装教程
[root@kvm ~]# vim redis-test.sh
#!/bin/bash
for i in {1..10000}
do
  echo "key${i} ${i}"
  redis-cli set key${i} ${i}
done

[root@kvm ~]# chmod a+x redis-test.sh
[root@kvm ~]# bash redis-test.sh
注:通过上述脚本生成测试数据~
[root@kvm ~]# cd redis
[root@kvm redis]# redis-server redis7000.conf
[root@kvm redis]# redis-server redis8000.conf
[root@kvm redis]# netstat -antulp |grep redis
tcp        0      0 0.0.0.0:8000            0.0.0.0:*               LISTEN      49289/redis-server
tcp        0      0 0.0.0.0:7000            0.0.0.0:*               LISTEN      48470/redis-server
二、redis-port工具
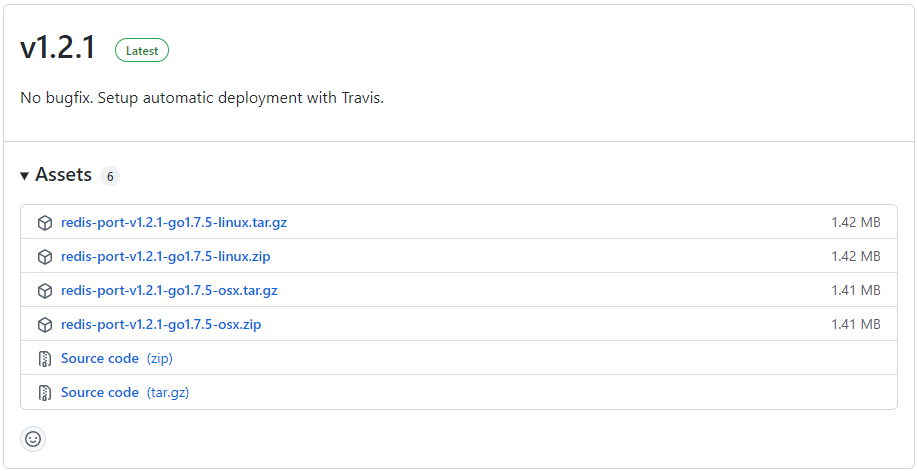
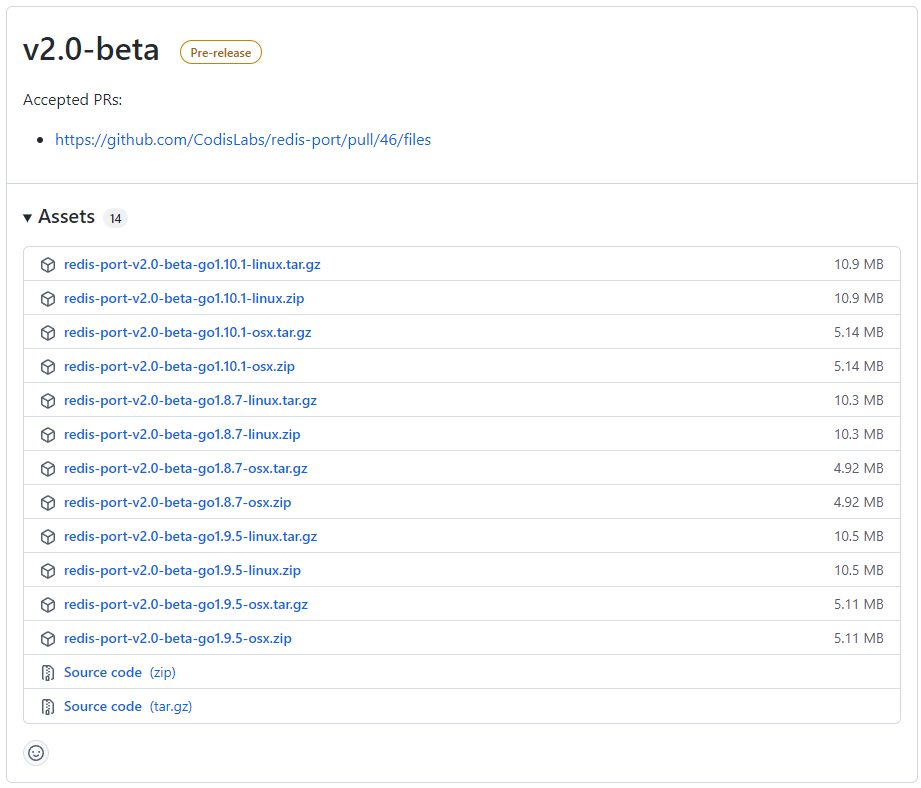
开源工具下载地址:https://github.com/CodisLabs/redis-port/releases

注:redis-port工具集v1.2.1是1.0版本中,最新版本,只有一个redis-port工具可以使用。

注:redis-port工具集2.0版本,新增redis-decode、redis-dump、redis-restore、redis-sync四个工具,下面我将逐一为大家介绍!
(1)下载redis-port工具集合
# 2.0版本下载地址
[root@kvm ~]# wget https://github.com/CodisLabs/redis-port/releases/download/v2.0-beta/redis-port-v2.0-beta-go1.10.1-linux.tar.gz

# 1.0版本下载地址
[root@kvm ~]# wget https://github.com/CodisLabs/redis-port/releases/download/v1.2.1/redis-port-v1.2.1-go1.7.5-linux.tar.gz

# 解压安装包
[root@kvm ~]# tar -zxvf redis-port-v2.0-beta-go1.10.1-linux.tar.gz
[root@kvm ~]# tar -zxvf redis-port-v1.2.1-go1.7.5-linux.tar.gz

[root@kvm ~]# tree redis-port-v2.0-beta-go1.10.1-linux/
redis-port-v2.0-beta-go1.10.1-linux/
├── redis-decode
├── redis-dump
├── redis-restore
├── redis-sync
└── version

0 directories, 5 files

[root@kvm ~]# tree redis-port-v1.2.1-go1.7.5-linux
redis-port-v1.2.1-go1.7.5-linux
├── redis-port
└── version

0 directories, 2 files
# 语法
[root@kvm redis-port-v1.2.1-go1.7.5-linux]# ./redis-port -h
Usage:
	redis-port decode   [--ncpu=N]  [--parallel=M]  [--input=INPUT]  [--output=OUTPUT]
	redis-port restore  [--ncpu=N]  [--parallel=M]  [--input=INPUT]  [--faketime=FAKETIME] [--extra] [--filterdb=DB] --target=TARGET [--auth=AUTH] [--redis|--codis]
	redis-port sync     [--ncpu=N]  [--parallel=M]   --from=MASTER   [--password=PASSWORD] [--psync] [--filterdb=DB] --target=TARGET [--auth=AUTH] [--redis|--codis] [--sockfile=FILE [--filesize=SIZE]]
	redis-port dump     [--ncpu=N]  [--parallel=M]   --from=MASTER   [--password=PASSWORD] [--extra] [--output=OUTPUT]
	redis-port --version

Options:
	-n N, --ncpu=N                    Set runtime.GOMAXPROCS to N.
	-p M, --parallel=M                Set the number of parallel routines to M.
	-i INPUT, --input=INPUT           Set input file, default is stdin ('/dev/stdin').
	-o OUTPUT, --output=OUTPUT        Set output file, default is stdout ('/dev/stdout').
	-f MASTER, --from=MASTER          Set host:port of master redis.
	-t TARGET, --target=TARGET        Set host:port of slave redis.
	-P PASSWORD, --password=PASSWORD  Set redis auth password.
	-A AUTH, --auth=AUTH              Set auth password for target.
	--faketime=FAKETIME               Set current system time to adjust key's expire time.
	--sockfile=FILE                   Use FILE to as socket buffer, default is disabled.
	--filesize=SIZE                   Set FILE size, default value is 1gb.
	-e, --extra                       Set true to send/receive following redis commands, default is false.
	--redis                           Target is normal redis instance, default is false.
	--codis                           Target is codis proxy, default is true.
	--filterdb=DB                     Filter db = DB, default is *.
	--psync                           Use PSYNC command.
(2)redis-port导出rdb文件
[root@kvm redis-port-v1.2.1-go1.7.5-linux]# ./redis-port dump -f 127.0.0.1:7000 -o /data/save.rdb
2022/03/25 11:48:48 main.go:189: [INFO] set ncpu = 32, parallel = 32
2022/03/25 11:48:48 dump.go:29: [INFO] dump from '127.0.0.1:7000' to '/data/save.rdb'
2022/03/25 11:48:48 dump.go:42: [INFO] rdb file = 118948
2022/03/25 11:48:48 dump.go:94: [INFO] total = 118948 -       118948 [100%]
2022/03/25 11:48:48 dump.go:96: [INFO] dump: rdb done

[root@kvm redis-port-v1.2.1-go1.7.5-linux]# ll /data/
total 120
drwxr-xr-x 2 root root     70 Mar 25 11:48 redis7000
drwxr-xr-x 2 root root     22 Mar 25 11:16 redis8000
-rw-r--r-- 1 root root 118948 Mar 25 11:48 save.rdb
注:待完善~
三、import_data.py迁移脚本
Import_data.py脚本,即python版本的导入导出工具,但其无法选择数据库号,只能操作默认的数据库0。并且只能离线使用,在线导数据,可能会失败。 另外,运行脚本前,需要安装python-redis插件。
安装包下载:![]() import_data.zip
import_data.zip
(1)使用方法如下
./import_data.py sourceIP sourcePort destIP destPort  connectionNum
◆ sourceIP:导出库ip(数据源)
◆ sourcePort:导出库port(数据源)
◆ destIP:导入库ip
◆ destPort:导入库Port
◆ connectionNum: 数据导入时使用的连接数
(2)操作演示
# 下载迁移脚本
[root@redis-v1 ~]# wget http://tools.ufile.ucloud.cn/import_data.zip
[root@redis-v1 ~]# unzip import_data.zip
[root@redis-v1 ~]# cd import_data
[root@redis-v1 import_data]# chmod a+x import_data.py

# 安装python-redis插件
[root@redis-v1 import_data]# yum install python-redis -y

# 执行脚本进行数据迁移
[root@redis-v1 import_data]# ./import_data.py 127.0.0.1 7000 127.0.0.1 8000 3
Begin Read Keys
String Key Count is: 10000
Set Key Count is: 0
ZSet Key Count is: 0
List Key Count is: 0
Hash Key Count is: 0
Finish, token time: 0:00:00.627966

# 查看数据迁移成功
[root@redis-v1 import_data]# redis-cli -p 8000
127.0.0.1:8000> keys *
……
 9999) "key7686"
10000) "key3040"
四、Redis-cli工具
(1)Redis-cli语法
[root@kvm ~]# redis-cli -h
redis-cli 5.0.5

Usage: redis-cli [OPTIONS] [cmd [arg [arg ...]]]
  -h <hostname>      Server hostname (default: 127.0.0.1).
  -p <port>          Server port (default: 6379).
  -s <socket>        Server socket (overrides hostname and port).
  -a <password>      Password to use when connecting to the server.
                     You can also use the REDISCLI_AUTH environment
                     variable to pass this password more safely
                     (if both are used, this argument takes predecence).
  -u <uri>           Server URI.
  -r <repeat>        Execute specified command N times.
  -i <interval>      When -r is used, waits <interval> seconds per command.
                     It is possible to specify sub-second times like -i 0.1.
  -n <db>            Database number.
  -x                 Read last argument from STDIN.
  -d <delimiter>     Multi-bulk delimiter in for raw formatting (default: \n).
  -c                 Enable cluster mode (follow -ASK and -MOVED redirections).
  --raw              Use raw formatting for replies (default when STDOUT is
                     not a tty).
  --no-raw           Force formatted output even when STDOUT is not a tty.
  --csv              Output in CSV format.
  --stat             Print rolling stats about server: mem, clients, ...
  --latency          Enter a special mode continuously sampling latency.
                     If you use this mode in an interactive session it runs
                     forever displaying real-time stats. Otherwise if --raw or
                     --csv is specified, or if you redirect the output to a non
                     TTY, it samples the latency for 1 second (you can use
                     -i to change the interval), then produces a single output
                     and exits.
  --latency-history  Like --latency but tracking latency changes over time.
                     Default time interval is 15 sec. Change it using -i.
  --latency-dist     Shows latency as a spectrum, requires xterm 256 colors.
                     Default time interval is 1 sec. Change it using -i.
  --lru-test <keys>  Simulate a cache workload with an 80-20 distribution.
  --replica          Simulate a replica showing commands received from the master.
  --rdb <filename>   Transfer an RDB dump from remote server to local file.
  --pipe             Transfer raw Redis protocol from stdin to server.
  --pipe-timeout <n> In --pipe mode, abort with error if after sending all data.
                     no reply is received within <n> seconds.
                     Default timeout: 30. Use 0 to wait forever.
  --bigkeys          Sample Redis keys looking for keys with many elements (complexity).
  --memkeys          Sample Redis keys looking for keys consuming a lot of memory.
  --memkeys-samples <n> Sample Redis keys looking for keys consuming a lot of memory.
                     And define number of key elements to sample
  --hotkeys          Sample Redis keys looking for hot keys.
                     only works when maxmemory-policy is *lfu.
  --scan             List all keys using the SCAN command.
  --pattern <pat>    Useful with --scan to specify a SCAN pattern.
  --intrinsic-latency <sec> Run a test to measure intrinsic system latency.
                     The test will run for the specified amount of seconds.
  --eval <file>      Send an EVAL command using the Lua script at <file>.
  --ldb              Used with --eval enable the Redis Lua debugger.
  --ldb-sync-mode    Like --ldb but uses the synchronous Lua debugger, in
                     this mode the server is blocked and script changes are
                     not rolled back from the server memory.
  --cluster <command> [args...] [opts...]
                     Cluster Manager command and arguments (see below).
  --verbose          Verbose mode.
  --no-auth-warning  Don't show warning message when using password on command
                     line interface.
  --help             Output this help and exit.
  --version          Output version and exit.

Cluster Manager Commands:
  Use --cluster help to list all available cluster manager commands.

Examples:
  cat /etc/passwd | redis-cli -x set mypasswd
  redis-cli get mypasswd
  redis-cli -r 100 lpush mylist x
  redis-cli -r 100 -i 1 info | grep used_memory_human:
  redis-cli --eval myscript.lua key1 key2 , arg1 arg2 arg3
  redis-cli --scan --pattern '*:12345*'

  (Note: when using --eval the comma separates KEYS[] from ARGV[] items)

When no command is given, redis-cli starts in interactive mode.
Type "help" in interactive mode for information on available commands
and settings.
(2)导出rdb文件
# 配置文件增加
[root@kvm ~]# vim redis/redis7000.conf
……
save 900 1                            # 900秒内有数据变更则写入RDB文件
save 300 10                           # 300秒内有10条以上数据变更则写入RDB文件
save 60 10000                         # 60秒内有10000条以上数据变更则写入RDB文件
语法:redis-cli -h {source_redis_address} -p 6379 -a {password} --rdb {output.rdb}
# 操作演示
[root@kvm ~]# redis-cli -h 127.0.0.1 -p 7000 --rdb 7000.rdb
SYNC sent to master, writing 118948 bytes to '7000.rdb'
Transfer finished with success.

注:执行命令后回显"Transfer finished with success.",表示文件导出成功。
注:待完善~
作者:UStarGao
链接:https://www.starcto.com/redis/281.html
来源:STARCTO
著作权归作者所有。商业转载请联系作者获得授权,非商业转载请注明出处。
UCloud云平台推荐
随便看看
- 2022-05-10Linux内网带宽压测工具-iperf3
- 2021-09-24Postfix邮件服务器安装部署
- 2021-05-12Speedtest网络带宽测速工具介绍
- 2021-08-10开源对象存储服务MinIO容器化部署
- 2021-08-05Redis持久化机制之AOF日志与RDB快照


