MongoDB分片集群安装部署教程
一、环境介绍
◆ 目标:搭建拥有两个分片的MongoDB分片集群,分别为shard1分片、shard2分片
◆ 环境:3台Linux虚拟机,4C8G,主机名分别名为starcto1、starcto2、starcto3
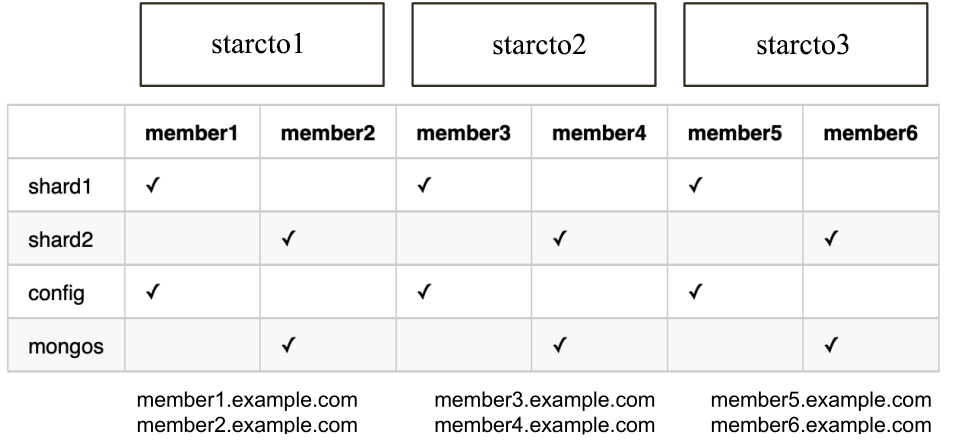
        ◆ starcto1扩展别名:member1.example.com/member2.example.com
        ◆ starcto2扩展别名:member3.example.com/member4.example.com
        ◆ starcto3扩展别名:member5.example.com/member6.example.com

 注:扩展别名,用于方便标识分片节点。
1.1 MongoDB架构介绍

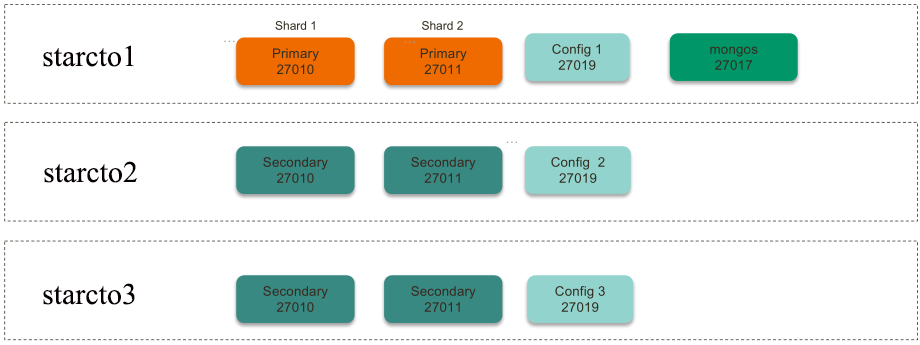
1.2 MongoDB节点分布

注:这里我为了节省虚机数量,单台虚机会部署多个MongoDB节点,生产环境中,建议每台机器部署一个节点。
二、部署配置过程
2.1 配置域名解析
在3台虚拟机上分别执行以下3条命令,注意替换实际 IP 地址
echo "192.168.122.46 starcto1 member1.example.com member2.example.com" >> /etc/hosts
echo "192.168.122.124 starcto2 member3.example.com member4.example.com" >> /etc/hosts
echo "192.168.122.178 starcto3 member5.example.com member6.example.com" >> /etc/hosts
2.2 准备分片目录
在各服务器上创建数据目录,我们使用 ‘/data’,请按自己需要修改为其他目录:
(1)在member1 / member3 / member5 上执行以下命令:
mkdir -p /data/shard1/
mkdir -p /data/config/
(2)在member2 / member4 / member6 上执行以下命令:
mkdir -p /data/shard2/
mkdir -p /data/mongos/
2.3 创建与初始化第一个分片复制集合(分片节点)
(1)创建分片
# 下载MongoDB
curl -O https://fastdl.mongodb.org/linux/mongodb-linux-x86_64-rhel70-4.2.1.tgz
tar -xvf mongodb-linux-x86_64-rhel70-4.2.1.tgz

# 将mongo、mongod、mongos等工具复制到/usr/local/bin目录下
[root@starcto1 ~]# cd mongodb-linux-x86_64-rhel70-4.2.1/bin/
[root@starcto1 bin]# cp * /usr/local/bin/

# 在 member1 / member3 / member5 上执行以下命令
mongod --bind_ip 0.0.0.0 --replSet shard1 --dbpath /data/shard1 --logpath /data/shard1/mongod.log --port 27010 --fork --shardsvr --wiredTigerCacheSizeGB 1
(2)初始化分片
# 关闭member1 / member3 / member5防火墙
systemctl stop firewalld.service
systemctl disable firewalld.service

# 初始化一个分片复制集
[root@starcto1 ~]# mongo --host member1.example.com:27010
rs.initiate({
  _id: "shard1",
  "members": [
    {
      "_id": 0,
      "host": "member1.example.com:27010"
    },
    {
      "_id": 1,
      "host": "member3.example.com:27010"
    },
    {
      "_id": 2,
      "host": "member5.example.com:27010"
    }
  ]
});
2.4 创建与初始化config server复制集(配置节点)
(1)创建配置节点
# 在 member1 / member3 / member5 上执行以下命令。
mongod --bind_ip 0.0.0.0 --replSet config --dbpath /data/config --logpath /data/config/mongod.log --port 27019 --fork --configsvr --wiredTigerCacheSizeGB 1
(2)初始化配置节点
# 连接配置节点
mongo --host member1.example.com:27019

# 初始化配置节点
rs.initiate({
  _id: "config",
  "members": [
    {
      "_id": 0,
      "host": "member1.example.com:27019"
    },
    {
      "_id": 1,
      "host": "member3.example.com:27019"
    },
    {
      "_id": 2,
      "host": "member5.example.com:27019"
    }
  ]
});
2.5 创建mongos节点
# 搭建mongos,并添加配置节点
mongos --bind_ip 0.0.0.0 --logpath /data/mongos/mongos.log --port 27017 --fork --configdb config/member1.example.com:27019,member3.example.com:27019,member5.example.com:27019

# 连接到mongos, 添加分片
mongo --host member1.example.com:27017
mongos> sh.addShard("shard1/member1.example.com:27010,member3.example.com:27010,member5.example.com:27010");
{
    "shardAdded" : "shard1",
    "ok" : 1,
    "operationTime" : Timestamp(1646408054, 7),
    "$clusterTime" : {
        "clusterTime" : Timestamp(1646408054, 7),
        "signature" : {
            "hash" : BinData(0,"AAAAAAAAAAAAAAAAAAAAAAAAAAA="),
            "keyId" : NumberLong(0)
        }
    }
}
2.6 创建分片表(开启分片)
# 连接到mongos, 创建分片集合
mongo --host member1.example.com:27017

# 查看分片集群状态
mongos> sh.status()
--- Sharding Status ---
  sharding version: {
    "_id" : 1,
    "minCompatibleVersion" : 5,
    "currentVersion" : 6,
    "clusterId" : ObjectId("62222ffebad25d048641cbb8")
  }
  shards:
        {  "_id" : "shard1",  "host" : "shard1/member1.example.com:27010,member3.example.com:27010,member5.example.com:27010",  "state" : 1 }
  active mongoses:
        "4.2.1" : 1
  autosplit:
        Currently enabled: yes
  balancer:
        Currently enabled:  yes
        Currently running:  no
        Failed balancer rounds in last 5 attempts:  0
        Migration Results for the last 24 hours:
                No recent migrations
  databases:
        {  "_id" : "config",  "primary" : "config",  "partitioned" : true }
                config.system.sessions
                        shard key: { "_id" : 1 }
                        unique: false
                        balancing: true
                        chunks:
                                shard1  1
                        { "_id" : { "$minKey" : 1 } } -->> { "_id" : { "$maxKey" : 1 } } on : shard1 Timestamp(1, 0)

# 针对foo集合启动分片
mongos> sh.enableSharding("foo");
{
    "ok" : 1,
    "operationTime" : Timestamp(1646408196, 5),
    "$clusterTime" : {
        "clusterTime" : Timestamp(1646408196, 5),
        "signature" : {
            "hash" : BinData(0,"AAAAAAAAAAAAAAAAAAAAAAAAAAA="),
            "keyId" : NumberLong(0)
        }
    }
}

# foo集合的bar文档的自增_id的hash作为片键,进行写分布
mongos> sh.shardCollection("foo.bar", {_id: 'hashed'});
{
    "collectionsharded" : "foo.bar",
    "collectionUUID" : UUID("3616a206-1ad7-4e99-906b-13b7b9ac76b4"),
    "ok" : 1,
    "operationTime" : Timestamp(1646408236, 13),
    "$clusterTime" : {
        "clusterTime" : Timestamp(1646408236, 13),
        "signature" : {
            "hash" : BinData(0,"AAAAAAAAAAAAAAAAAAAAAAAAAAA="),
            "keyId" : NumberLong(0)
        }
    }
}

# 再次查看分片集群状态
mongos> sh.status();
--- Sharding Status ---
  sharding version: {
    "_id" : 1,
    "minCompatibleVersion" : 5,
    "currentVersion" : 6,
    "clusterId" : ObjectId("62222ffebad25d048641cbb8")
  }
  shards:
        {  "_id" : "shard1",  "host" : "shard1/member1.example.com:27010,member3.example.com:27010,member5.example.com:27010",  "state" : 1 }
  active mongoses:
        "4.2.1" : 1
  autosplit:
        Currently enabled: yes
  balancer:
        Currently enabled:  yes
        Currently running:  no
        Failed balancer rounds in last 5 attempts:  0
        Migration Results for the last 24 hours:
                No recent migrations
  databases:  # 数据库
        {  "_id" : "config",  "primary" : "config",  "partitioned" : true }
                config.system.sessions
                        shard key: { "_id" : 1 }
                        unique: false
                        balancing: true
                        chunks:
                                shard1  1
                        { "_id" : { "$minKey" : 1 } } -->> { "_id" : { "$maxKey" : 1 } } on : shard1 Timestamp(1, 0)
        {  "_id" : "foo",  "primary" : "shard1",  "partitioned" : true,  "version" : {  "uuid" : UUID("29d23289-dd58-401c-9ed8-1e66db2b3628"),  "lastMod" : 1 } }
# foo数据库、shard1是主分片、已经开启分区表
                foo.bar                                  # 分片表会被列出来
                        shard key: { "_id" : "hashed" }  # 片键是_id hash
                        unique: false
                        balancing: true                  # 开启自动均衡
                        chunks:                          # 块数量
                                shard1  2                # shard1上有两个块
                        { "_id" : { "$minKey" : 1 } } -->> { "_id" : NumberLong(0) } on : shard1 Timestamp(1, 0)
                        { "_id" : NumberLong(0) } -->> { "_id" : { "$maxKey" : 1 } } on : shard1 Timestamp(1, 1)

# 模拟插入数据
use foo
for (var i = 0; i < 10000; i++) {
      db.bar.insert({i: i});
}
2.7 创建与初始化第2个分片复制集(横向扩容分片)
(1)创建分片复制集
# 在 member2 / member4 / member6 上执行以下命令
mongod --bind_ip 0.0.0.0 --replSet shard2 --dbpath /data/shard2 --logpath /data/shard2/mongod.log --port 27011 --fork --shardsvr --wiredTigerCacheSizeGB 1
(2)初始化第2个分片复制集
mongo --host member2.example.com:27011

rs.initiate({
  _id: "shard2",
  "members": [
    {
      "_id": 0,
      "host": "member2.example.com:27011"
    },
    {
      "_id": 1,
      "host": "member4.example.com:27011"
    },
    {
      "_id": 2,
      "host": "member6.example.com:27011"
    }
  ]
});
(3)将第2个分片加入分片集群
# 连接到mongos, 添加分片
mongo --host member1.example.com:27017
mongos> sh.addShard("shard2/member2.example.com:27011,member4.example.com:27011,member6.example.com:27011");

# 查看分片集群状态
mongos> sh.status()
--- Sharding Status ---
  sharding version: {
    "_id" : 1,
    "minCompatibleVersion" : 5,
    "currentVersion" : 6,
    "clusterId" : ObjectId("62222ffebad25d048641cbb8")
  }
  shards:
        {  "_id" : "shard1",  "host" : "shard1/member1.example.com:27010,member3.example.com:27010,member5.example.com:27010",  "state" : 1 }
        {  "_id" : "shard2",  "host" : "shard2/member2.example.com:27011,member4.example.com:27011,member6.example.com:27011",  "state" : 1 }
  active mongoses:
        "4.2.1" : 1
  autosplit:
        Currently enabled: yes
  balancer:
        Currently enabled:  yes
        Currently running:  no
        Failed balancer rounds in last 5 attempts:  0
        Migration Results for the last 24 hours:
                1 : Success
  databases:
        {  "_id" : "config",  "primary" : "config",  "partitioned" : true }
                config.system.sessions
                        shard key: { "_id" : 1 }
                        unique: false
                        balancing: true
                        chunks:
                                shard1  1
                        { "_id" : { "$minKey" : 1 } } -->> { "_id" : { "$maxKey" : 1 } } on : shard1 Timestamp(1, 0)
        {  "_id" : "foo",  "primary" : "shard1",  "partitioned" : true,  "version" : {  "uuid" : UUID("29d23289-dd58-401c-9ed8-1e66db2b3628"),  "lastMod" : 1 } }
                foo.bar
                        shard key: { "_id" : "hashed" }
                        unique: false
                        balancing: true
                        chunks:                 # 新增分片后,MongoDB自动将两个块分布到两个分片上
                                shard1  1
                                shard2  1
                        { "_id" : { "$minKey" : 1 } } -->> { "_id" : NumberLong(0) } on : shard2 Timestamp(2, 0)
                        { "_id" : NumberLong(0) } -->> { "_id" : { "$maxKey" : 1 } } on : shard1 Timestamp(2, 1)
注:MongoDB分片集群,每增加一个分片,MongoDB就会自动做数据均衡,把块移动均衡到新的分片上。
作者:UStarGao
链接:https://www.starcto.com/mongodb/284.html
来源:STARCTO
著作权归作者所有。商业转载请联系作者获得授权,非商业转载请注明出处。
UCloud云平台推荐
随便看看
- 2022-01-15K8S Pod模板介绍
- 2021-03-27Grafana安装部署教程
- 2022-07-21Linux 磁盘性能指标之磁盘I/O观测与进程I/O观测
- 2022-03-08Linux SSH的SSL弱加密算法漏洞修复
- 2021-08-16UDP测试解决方案


