Postfix邮件服务器安装部署
一、Postfix邮件服务器介绍
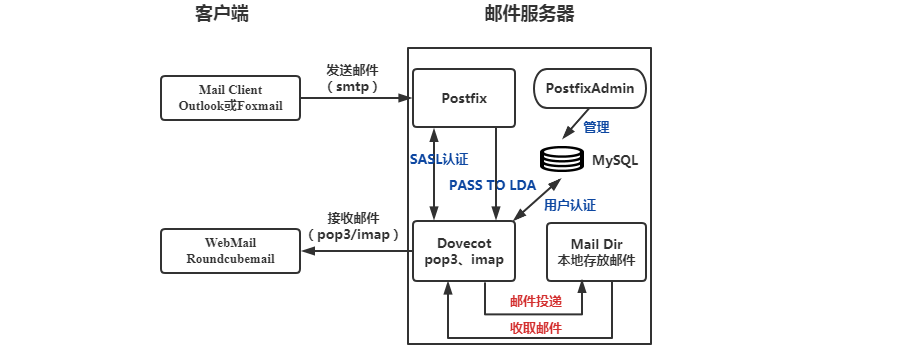
Postfix邮件服务器主要由cyrus-sasl、postfix、dovecot、postfixadmin、roundcubemail等5个组件组成。

1.1 主流电子邮件服务器软件
在 linux 平台中,有许多邮件服务器可供选择,但目前使用最多的是 sendmail 服务器、postfix 服务器和Qmail 服务器。
◆ Sendmail 是一个很优秀的邮件服务软件。几乎所有 linux 的缺省配置中都内置了这个软件,只需要设置好操作系统,它就能立即运转起来。
◆ Postfix 是一个由 IBM 资助下由 Wietse Venema 负责开发的一个自由软件工程产物,它的目的就是为用户提供除 Sendmail 之外的邮件服务器选择。
◆ Qmail 是有 Dan Bernstein 开发的可以自由下载邮件服务器软件,其第一个 beta 版本 0.7 发布于 1996年 1 月 24 日。
1.2 Postfix介绍
(1)Postfix功能简介
◆ Postfix 邮件服务器是使用得十分广泛的邮件提交工具(MSP)。
◆ 在邮件模型中承担着 MTA 及 MDA 的作用。
◆ 支持多种类型的邮件地址寻址。
◆ 支持虚拟域及虚拟用户。
◆ 提供在投递失败后自动重发等多种错误应对策略。(2)Postfix进程介绍
◆ 后台进程:postfix
◆ 安装包:postfix
◆ 所用端口:25(SMTP)
◆ 主配置文件:/etc/postfix/main.cf
1.3 SMTP协议
◆ SMTP(Simple Mail Transfer Protocol)简单邮件传送协议。
◆ 定义邮件传送(明文传送)
◆ 基于 TCP 服务器的应用层。
◆ SMTP 协议使用 25 端口。
◆ 在安装 postfix 邮件服务器时,此协议有随之安装在系统中。
1.4 客户端协议
(1)POP3协议
◆ POP3:Post Office Protocol3/邮局协议第三版
◆ POP3 协议适用于不能时时在线的邮件用户。支持客户在服务器上租用信箱,然后利用 POP3 协议向服务器请求下载。
◆ 基于 TCP/IP 协议与客户端/服务端模型
◆ POP3 的认证与邮件传送都采用明文
◆ 使用 110 端口
(2)IMAP协议
◆ IMAP:Internet Message Access Protocol/英特网信息存取协议
◆ 另一种从邮件服务器上获取邮件的协议
◆ 与 POP3 相比,支持在下载邮件前先行下载邮件头以预览邮件的主题来源
◆ 基于 TCP/IP
◆ 使用 143 端口
二、Postfix邮件服务器部署
2.1 cyrus-sasl部署
cyrus-sasl(Simple Authentication Security Layer)简单认证安全层, SASL主要是用于SMTP认证。而cyrus-sasl在OS里面,saslauthd是其守护进程。
(1)安装cyrus-sasl包
[root@10-27-0-224 ~]# yum -y install cyrus-sasl -y
(2)版本查看
[root@10-27-0-224 ~]# saslauthd -v
saslauthd 2.1.26
authentication mechanisms: getpwent kerberos5 pam rimap shadow ldap httpform
saslauthd是认证服务cyrus-sasl的守护进程,所以我们就可以通过saslauthd查看cyrus-sasl的版本。
(3)修改cyrus-sasl配置
[root@10-27-0-224 ~]# vim /etc/sysconfig/saslauthd
SOCKETDIR=/run/saslauthd
MECH=shadow              # 修改saslauthd文件把MECH的值修改为shadow
FLAGS=
(4)修改smtpd.conf文件,新增以下内容
[root@10-27-0-224 ~]# vim /etc/sasl2/smtpd.conf
log_level: 3
saslauthd_path:/var/run/saslauthd/mux
(5)测试cyrus-sasl功能
创建系统用户stargao,并设置密码
[root@10-27-0-224 ~]# useradd stargao &&echo 'stargao-mail' | passwd --stdin stargao
Changing password for user stargao.
passwd: all authentication tokens updated successfully.

[root@10-27-0-224 ~]# ll /home/
total 0
drwx------ 2 stargao stargao 62 Sep 24 00:43 stargao
[root@10-27-0-224 ~]# ll /var/spool/mail/
total 0
-rw-rw---- 1 stargao mail 0 Sep 24 00:43 stargao

[root@10-27-0-224 ~]# userdel -r stargao             # 彻底删除用户
测试stargao用户
[root@10-27-0-224 ~]# su - stargao
[stargao@10-27-0-224 ~]$ mkdir -p ~/mail/.imap/INBOX
[stargao@10-27-0-224 ~]$ ls -al ~/mail/.imap/
total 0
drwxrwxr-x 3 stargao stargao 19 Sep 24 00:46 .
drwxrwxr-x 3 stargao stargao 19 Sep 24 00:46 ..
drwxrwxr-x 2 stargao stargao  6 Sep 24 00:46 INBOX
启动cyrus-sasl服务
[root@10-27-0-224 ~]# systemctl restart saslauthd.service
[root@10-27-0-224 ~]# systemctl enable saslauthd.service
Created symlink from /etc/systemd/system/multi-user.target.wants/saslauthd.service to /usr/lib/systemd/system/saslauthd.service.
测试cyrus-sasl服务
[root@10-27-0-224 ~]# testsaslauthd -u stargao -p 'stargao-mail'
0: OK "Success."
2.2 postfix部署-发送邮件
postfix是一个电子邮件服务器,它为了改良sendmail邮件服务器而产生的,并且它的配置文件比sendmail简单得多,配置相当容易。
◆ 配置好域名解析:
A记录: mail.starcto.com   $IP
MX记录:starcto.com  mail.starcto.com

◆ 配置好域名反向解析
mail.starcto.com $IP
(1)安装postfix
[root@10-27-0-224 ~]# yum -y install postfix
第三方YUM源: https://repos.fedorapeople.org/repos/mstevens/postfix/epel-postfix.repo
(2)查看postfix安装版本
[root@10-27-0-224 ~]# postconf -d | grep mail_version
mail_version = 2.10.1
milter_macro_v = $mail_name $mail_version
(3)修改postfix配置
postfix的配置选项特别多,下面我们先了解最基本的发送邮件配置
# 备份配置文件
[root@10-27-0-224 ~]# cd /etc/postfix/
[root@10-27-0-224 postfix]# mv main.cf main.cf.bak

[root@10-27-0-224 postfix]# cat main.cf.bak | grep -v '#' | grep -v '^$' > main.cf
[root@10-27-0-224 ~]# vim /etc/postfix/main.cf
queue_directory = /var/spool/postfix
command_directory = /usr/sbin
daemon_directory = /usr/libexec/postfix
data_directory = /var/lib/postfix
mail_owner = postfix
inet_interfaces = all
inet_protocols = all
myhostname = mail.starcto.com
mydomain = starcto.com
myorigin = $mydomain
mydestination = $myhostname, localhost.$mydomain, localhost
mynetworks = 0.0.0.0/0             # 注意增加这条,否则发生邮件时会报错Relay access denied
local_recipient_maps =
unknown_local_recipient_reject_code = 550
alias_maps = hash:/etc/aliases
alias_database = hash:/etc/aliases

debug_peer_level = 2
debugger_command =
	 PATH=/bin:/usr/bin:/usr/local/bin:/usr/X11R6/bin
	 ddd $daemon_directory/$process_name $process_id & sleep 5
sendmail_path = /usr/sbin/sendmail.postfix
newaliases_path = /usr/bin/newaliases.postfix
mailq_path = /usr/bin/mailq.postfix
setgid_group = postdrop
html_directory = no
manpage_directory = /usr/share/man
sample_directory = /usr/share/doc/postfix-2.10.1/samples
readme_directory = /usr/share/doc/postfix-2.10.1/README_FILES
(4)测试postfix服务
# 启动postfix服务
[root@10-27-0-224 ~]# systemctl restart postfix.service
[root@10-27-0-224 ~]# systemctl enable postfix.service

# 查看postfix服务
[root@10-27-0-224 ~]# netstat -tunlp
Active Internet connections (only servers)
Proto Recv-Q Send-Q Local Address           Foreign Address         State       PID/Program name
tcp        0      0 0.0.0.0:25              0.0.0.0:*               LISTEN      56256/master

[root@10-27-0-224 ~]# ps -ef |grep postfix
root      56256      1  0 02:17 ?        00:00:00 /usr/libexec/postfix/master -w
postfix   56257  56256  0 02:17 ?        00:00:00 pickup -l -t unix -u
postfix   56258  56256  0 02:17 ?        00:00:00 qmgr -l -t unix -u
root      56497  51150  0 02:18 pts/0    00:00:00 grep --color=auto postfix
通过上述,我们可以很明显的看到postfix已经正常启动,并且监听的是tcp的25端口。postfix启动后,我们也可以通过postfix的日志进行查看。postfix的日志文件为/var/log/maillog。
[root@10-27-0-224 ~]# tail -f /var/log/maillog
Sep 22 03:47:05 10-27-0-224 postfix/sendmail[96532]: fatal: parameter inet_interfaces: no local interface found for ::1
Sep 23 03:16:03 10-27-0-224 postfix/sendmail[71098]: fatal: parameter inet_interfaces: no local interface found for ::1
Sep 24 00:56:31 10-27-0-224 postfix[39947]: fatal: parameter inet_interfaces: no local interface found for ::1
Sep 24 00:56:49 10-27-0-224 postfix[40117]: name_mask: all
Sep 24 00:56:49 10-27-0-224 postfix[40117]: name_mask: subnet
Sep 24 00:56:49 10-27-0-224 postfix[40117]: inet_addr_local: configured 4 IPv4 addresses
Sep 24 00:56:49 10-27-0-224 postfix[40117]: inet_addr_local: configured 0 IPv6 addresses
Sep 24 00:56:49 10-27-0-224 postfix[40117]: fatal: parameter inet_interfaces: no local interface found for ::1
Sep 24 02:17:06 10-27-0-224 postfix/postfix-script[56254]: starting the Postfix mail system
Sep 24 02:17:06 10-27-0-224 postfix/master[56256]: daemon started -- version 2.10.1, configuration /etc/postfix
(5)测试发送邮件
[root@10-27-0-224 ~]# telnet mail.starcto.com 25
Trying 107.155.48.73...
Connected to mail.starcto.com.
Escape character is '^]'.
220 mail.starcto.com ESMTP Postfix
mail from:admin@starcto.com
250 2.1.0 Ok
rcpt to:starcto@163.com
250 2.1.5 Ok
data
354 End data with <CR><LF>.<CR><LF>
This is stargao.
.
250 2.0.0 Ok: queued as 8610620424C0
quit
221 2.0.0 Bye
Connection closed by foreign host.
登录163邮箱,查看邮件接收情况
2.3 dovecot功能介绍-接收邮件
◆ dovecot是一个开源的IMAP和POP3邮件服务器,支持Linux/Unix系统。
◆ POP/IMAP是MUA从邮件服务器中读取邮件时使用的协议。其中,与POP3是从邮件服务器中下载邮件存起来,IMAP则是将邮件留在服务器端直接对邮件进行管理、操作。
◆ dovecot可以被其他具有相同功能的软件替代,比如:cyrus-imapd。

配置smtp与pop域名解析:
smtp.starcto.com $IP
pop.starcto.com $IP
(1)安装dovecot
[root@10-27-0-224 ~]# yum -y install dovecot dovecot-devel dovecot-mysql pam-devel
第三方yum源:http://repos.fedorapeople.org/repos/mstevens/dovecot/epel-dovecot.repo
(2)查看dovecot版本
[root@10-27-0-224 ~]# dovecot --version
2.2.36 (1f10bfa63)
(3)修改dovecot.conf配置
[root@10-27-0-224 ~]# cd /etc/dovecot/
[root@10-27-0-224 dovecot]# mv dovecot.conf dovecot.conf.bak
[root@10-27-0-224 dovecot]# cat dovecot.conf.bak | grep -v '#' | grep -v '^$' > dovecot.conf
[root@10-27-0-224 dovecot]# vim dovecot.conf
protocols = imap pop3
listen = *
(4)修改10-auth.conf配置
[root@10-27-0-224 ~]# vim /etc/dovecot/conf.d/10-auth.conf
disable_plaintext_auth = no
auth_mechanisms = plain login
!include auth-system.conf.ext
(5)修改10-ssl.conf,禁用ssl认证
[root@10-27-0-224 ~]# vim /etc/dovecot/conf.d/10-ssl.conf
ssl = no
(6)启用dovecot日志
[root@10-27-0-224 ~]# vim /etc/dovecot/conf.d/10-logging.conf
info_log_path = /var/log/dovecot_info.log
debug_log_path = /var/log/dovecot_debug.log
(7)启动dovecot服务
[root@10-27-0-224 ~]# systemctl restart dovecot.service
[root@10-27-0-224 ~]# systemctl enable dovecot.service
Created symlink from /etc/systemd/system/multi-user.target.wants/dovecot.service to /usr/lib/systemd/system/dovecot.service.
(8)测试dovecot,出现+Ok Dovecot ready,则表示dovecot配置正确。
[root@10-27-0-224 ~]# telnet mail.starcto.com 110
Trying 107.155.48.73...
Connected to mail.starcto.com.
Escape character is '^]'.
+OK Dovecot ready.
Connection closed by foreign host.

[root@10-27-0-224 ~]# telnet mail.starcto.com 143
Trying 107.155.48.73...
Connected to mail.starcto.com.
Escape character is '^]'.
* OK [CAPABILITY IMAP4rev1 LITERAL+ SASL-IR LOGIN-REFERRALS ID ENABLE IDLE AUTH=PLAIN AUTH=LOGIN] Dovecot ready.
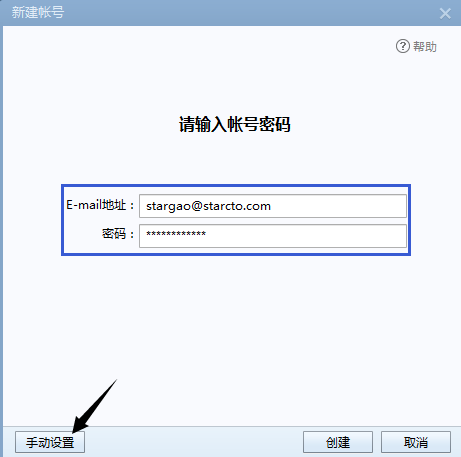
(9)foxmail客户端连接测试
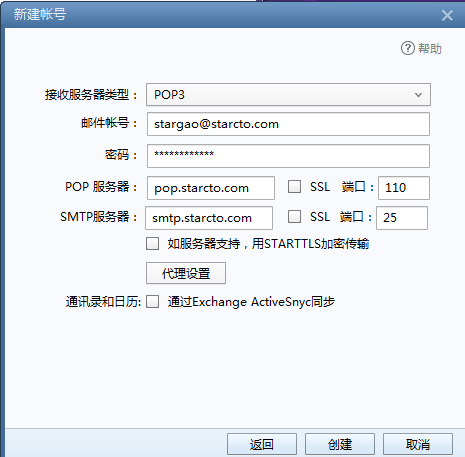
注意:用户就是我们2.1部分创建的stargao用户,具体过程如下:


由上图可以看出,邮件成功登录到了服务器。
2.4 postfixadmin部署-邮件用户/虚拟域名管理
postfixadmin是一个基于web的postfix邮件发送服务器的管理工具,可以直接管理postfix的虚拟域名和邮件用户,前提是这些数据是存储在mysql或者是PostgreSQL数据库中。安装包下载地址:https://github.com/postfixadmin/postfixadmin/tags
一键部署LNMP参考:(无人值守工具生成:https://lnmp.org/auto.html)
[root@10-27-0-224 ~]# wget http://soft.vpser.net/lnmp/lnmp1.8.tar.gz -cO lnmp1.8.tar.gz && tar zxf lnmp1.8.tar.gz && cd lnmp1.8 && ./install.sh lnmp
(1)安装PostfixAdmin
[root@10-27-0-224 ~]# yum install httpd -y
[root@10-27-0-224 ~]# wget http://nchc.dl.sourceforge.net/project/postfixadmin/postfixadmin/postfixadmin-2.93/postfixadmin-2.93.tar.gz
[root@10-27-0-224 ~]# tar -xf postfixadmin-2.93.tar.gz -C /var/www/html/
[root@10-27-0-224 ~]# cd /var/www/html/
[root@10-27-0-224 html]# mv postfixadmin-2.93/ postfixadmin
[root@10-27-0-224 html]# chown -R apache:apache /var/www/html/postfixadmin
[root@10-27-0-224 html]# chmod -R 755 /var/www/html/postfixadmin
(2)修改config.inc.php文件
[root@10-27-0-224 html]# cd postfixadmin/
[root@10-27-0-224 postfixadmin]# vim config.inc.php
$CONF['configured'] = true;                 # 默认false
$CONF['default_language'] = 'cn';           # 默认en
$CONF['database_type'] = 'mysqli';
$CONF['database_host'] = 'localhost';
$CONF['database_user'] = 'postfix';
$CONF['database_password'] = 'postfix';     # 默认postfixadmin
$CONF['database_name'] = 'postfix';
$CONF['encrypt'] = 'dovecot:CRAM-MD5';
$CONF['dovecotpw'] = "/usr/bin/doveadm pw";
$CONF['domain_path'] = 'YES';
$CONF['domain_in_mailbox'] = 'NO';
$CONF['aliases'] = '1000';
$CONF['mailboxes'] = '1000';
$CONF['maxquota'] = '1000';
$CONF['fetchmail'] = 'NO';
$CONF['quota'] = 'YES';                     # 默认NO
$CONF['used_quotas'] = 'YES';               # 默认NO
$CONF['new_quota_table'] = 'YES';

# 在创建管理员账户时 如果提示邮箱格式不对  要么做DNS 要么关闭 domain 改为 'NO'
$CONF['emailcheck_resolve_domain']='NO';
(3)PostfixAdmin 数据库配置
推荐文章:MySQL YUM安装教程
[root@10-27-0-224 ~]# mysql -uroot -ppostfix
mysql> create database postfix character set utf8 collate utf8_bin;                     # 创建postfix 数据库;设置支持utf8 支持
mysql> grant all privileges on postfix.* to postfix@localhost identified by 'postfix';  # 设置postfix web安装时候链接数据库

mysql> show databases;
+--------------------+
| Database           |
+--------------------+
| information_schema |
| mysql              |
| performance_schema |
| postfix            |
| sys                |
+--------------------+
2.5 roundcubemail部署-web邮件客户端
◆ roundcubemail是一个基于浏览器,支持多国语言的IMAP客户端,它的操作界面看起像一个桌面应用程序。它提供一个email客户端应该具备的所有功能,包括MIME支持,地址薄,文件夹操作,信息搜索和拼写检查等。
◆ roundcubemail采用PHP+Ajax开发并且需要MySQL数据库来存储数据。 用户界面采用XHTML+CSS2设计。
◆ roundcubemail可以被其他具有相同功能的软件替代,比如:openwebmail、squireelmail。
作者:UStarGao
链接:https://www.starcto.com/application_of_operational/242.html
来源:STARCTO
著作权归作者所有。商业转载请联系作者获得授权,非商业转载请注明出处。
UCloud云平台推荐
随便看看
- 2021-08-07CI/CD Pipeline之Jenkins部署
- 2022-03-01Linux CPU与内存常见问题处理技巧
- 2021-10-08 Microsoft SQL Server数据迁移解决方案
- 2021-03-03Linux内存管理机制
- 2023-01-31UCloud MySQL innodbackup物理备份还原到本地


